Heat pump outdoor unit placement starts with a model-specific plan, not a generic distance found online. Choose a stable, accessible location where the quoted equipment’s required clearances can be met without creating avoidable conflicts with windows, walkways, irrigation, or nearby homes. A licensed HVAC contractor should confirm that choice against the equipment manual, current local requirements, and any HOA documents.
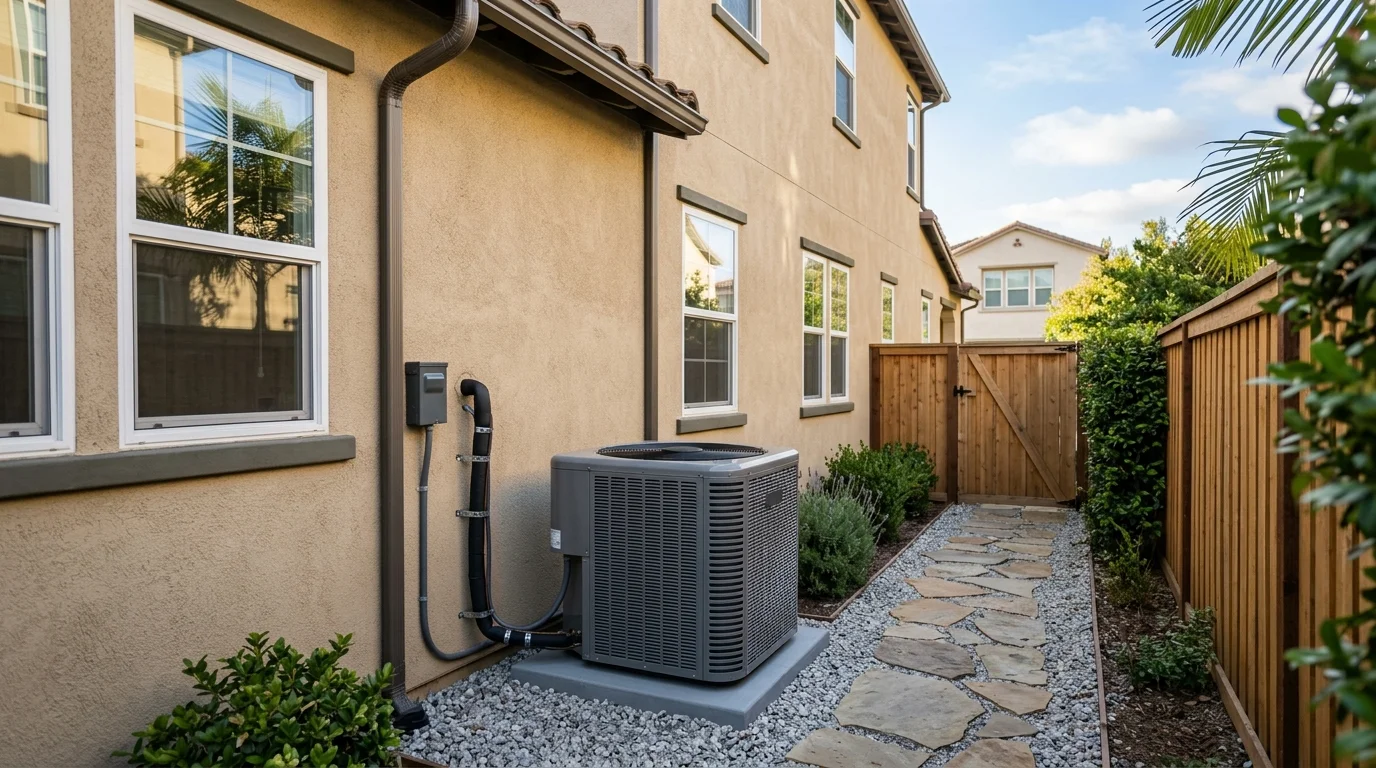
What the outdoor unit needs around it
Start with the exact make and model in the installation proposal. Its manual should identify the space required around each side. Those dimensions can differ by equipment, wall position, and nearby obstructions. This guide can’t confirm one clearance that works for every heat pump.
Ask the contractor to mark the proposed unit footprint on the ground. The drawing should also show the wall, fence, gate, roof edge, and permanent landscaping. Then compare those measurements with the quoted model’s instructions. Don’t rely on a clearance copied from another brand or a different unit size.
Access deserves equal attention. The installer should confirm which side contains the service area and how a technician would reach it later. A location can appear open while leaving little room beside a fence, storage bin, or gate. Think about the full route from the street or driveway, not only the final pad.
The equipment also needs a planned connection to the indoor system. Ask where the refrigerant lines, electrical components, and protective covering would run. The proposal should identify how the unit will be supported and where water associated with the system will go. Exact requirements must come from the manufacturer and the authority reviewing the project.
If you’re planning a whole-home system, review the location during the central heat pump installation estimate. Placement should be part of the system design, not a decision left until equipment arrives.
How windows and neighboring homes affect the choice
Stand at each possible location and look outward. Note nearby bedroom windows, doors, patios, gates, and outdoor seating. Then repeat that check from inside the house. A spot beside a rarely used garage may feel different from one below a bedroom window.
Sound should be discussed using the quoted model’s published information. Ask the contractor for that information and how the proposed layout affects what occupants may hear. Don’t accept a vague promise that every new unit will be quiet. Equipment, installation details, walls, and nearby surfaces differ.
Neighboring homes also matter, especially where buildings sit close together. Walk to the property line and identify the nearest windows and gathering areas. In a North Park side passage or a compact Chula Vista yard, a small move may change which room faces the unit. That doesn’t create a universal answer, but it gives the contractor a better placement problem to solve.
Fences and walls shouldn’t be treated as automatic sound fixes. They may also affect the model’s required spacing. Ask the contractor to compare any proposed screen, enclosure, or barrier with the installation manual before approving it.
No verified, universal San Diego noise distance was available for this guide. Ask the matched contractor to identify the current rule for the project address and show how the selected location meets it. Keep that confirmation with the proposal and approval documents.
Why sun, plants, and irrigation deserve attention
Watch each candidate spot during the day. A shaded Encinitas patio and a sun-exposed El Cajon wall present different site conditions. Sun alone doesn’t supply a model-specific placement answer. The contractor should confirm whether the manufacturer gives instructions for the conditions at your chosen location.
Plants can make an open location crowded later. Mark the expected space around hedges, vines, and shrubs before approving the plan. Ask who will keep that area within the manufacturer’s stated requirements. Avoid assuming that seasonal trimming will always happen before equipment access is needed.
Irrigation needs its own walkthrough. Turn on the nearby system and watch where spray lands. Check drip lines, hose connections, roof runoff, and low points where water collects. A proposed equipment location shouldn’t be approved until the contractor explains how those conditions fit the model’s instructions and project plan.
Decorative screens are another common decision point. Homeowners may want to hide the equipment from a patio or street view. Before adding one, get the screen’s location and dimensions reviewed with the outdoor unit plan. The manufacturer’s clearance instructions still govern the quoted equipment.
Take photos from several angles before the estimate ends. Include the wall, ground, vegetation, irrigation, and nearest opening. These photos give competing contractors the same starting point. They also make it easier to compare proposals without depending on memory.
Placement problems in narrow San Diego side yards
A narrow side yard can look like the obvious location because it’s out of view. It can also contain the home’s busiest service route. Measure the usable passage around gates, utility equipment, storage, eaves, and fence posts before choosing it.
Don’t measure only the outdoor unit’s cabinet. Ask the contractor to mark the full area required by the specific manual. The plan should identify the service side and show how someone would approach it. It should also account for anything that swings, opens, or moves through that passage.
Think through ordinary use. Will trash bins pass the location? Does the gate need its full swing? Will a bicycle, ladder, or garden cart still fit? These aren’t code conclusions. They’re practical conflicts that can make a technically possible spot frustrating for the household.
Line routing can change the choice as well. Ask the contractor to draw the proposed route between the outdoor and indoor equipment. Compare that route at every candidate location. A shorter-looking path isn’t automatically better if it conflicts with doors, windows, drainage, or the equipment instructions.
If the side yard can’t satisfy the quoted model’s documented needs, ask for another layout or equipment option. Don’t approve an improvised squeeze based on an unverified rule of thumb. Before work begins, review what happens during heat pump installation day in San Diego so access and staging aren’t surprises.
What an HOA or local authority may control
An HOA may ask for information about exterior changes before work begins. The exact documents and approval process weren’t confirmed for every San Diego County community. Read your own governing documents and request current instructions directly from the association or property manager.
Ask whether the review needs an equipment sheet, location drawing, photos, screening details, or written contractor information. Don’t assume a neighbor’s earlier approval applies to your project. Equipment and governing documents may differ. Our guide to a heat pump in a San Diego condo or HOA explains how to organize that conversation.
Local approval also depends on the project address and scope. No single setback, noise limit, or outdoor-unit placement rule was confirmed for this guide. Have the contractor identify the authority responsible for the address, then verify the current requirements with that office. Depending on the address, the contact may be the City of San Diego, another city, or a county office.
Placement and permit planning should happen together. Moving the outdoor unit after review can affect drawings and other project details. Read the San Diego heat pump permit guide before accepting a location as final.
Heat Pro SD connects homeowners with licensed independent pros and performs no physical work. Before signing, check the contractor’s license through the official California Contractors State License Board lookup.
What to settle before signing the installation proposal
The final proposal should make the outdoor location easy to identify. A street address and the words “side yard” aren’t enough when that wall contains several possible spots. Ask for a marked photo, sketch, or plan tied to fixed features such as a corner, gate, or window.
Confirm these details in writing:
- The exact outdoor equipment model
- The model manual used for placement
- The unit’s marked footprint and orientation
- The required space on each relevant side
- The service-access side and approach route
- The planned support location
- The proposed line and electrical route
- The treatment of irrigation and roof runoff
- Any fence, screen, or planting changes
- The responsible permitting authority
- Any HOA submission or approval still pending
- The process for approving a changed location
Walk the plan with the contractor before signing. View it from the nearest rooms, patio, gate, and neighboring side. If two locations remain possible, ask the contractor to explain each tradeoff using the manual and current project requirements.
Don’t let an unmarked alternative become the default on installation day. If field conditions force a change, request a revised location that still addresses manufacturer instructions, local review, and HOA conditions. The contractor should document the accepted change before proceeding.
Keep the equipment information, placement drawing, approvals, and contractor terms together. That record can help during later service visits. It also shows future homeowners why the location was selected.
When to call us
Call when you need a licensed Heat Pump Installation pro to compare outdoor locations, check model-specific instructions, or prepare a proposal for local review. Heat Pro SD serves homeowners across San Diego County and performs no installation work itself. Call us at (858) 400-4374 and we’ll connect you with a licensed local HVAC contractor.